An aquaponics system is really quite simple. You have a fish tank, and a grow bed. The water from the fish tank is pumped through the grow bed to filter it and remove the fish waste.
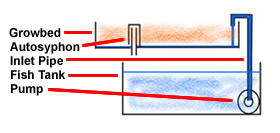
There are many different approaches to aquaponics, but on this site, we will concentrate on what we consider to be the two simplest and most efficient methods.
As our focus is on do-it-yourself aquaponics, understanding the basic principles of our two chosen methods is preferable so that you can use and adapt available materials to construct your system.
Using an Auto Siphon Flood and Drain System
A flood and drain-style aquaponics system with an auto-siphon seem to be the standard with home aquaponics users at the moment. An auto-siphon is a handy little gizmo that automatically siphons the water from the grow bed when it reaches a certain level.
They can be purchased from aquaponics suppliers or easily constructed if you prefer that real DIY approach. They are quite simple in design and can be made from PVC pipe and fittings purchased at your local hardware store.
Our auto-siphon system comprises a fish tank (blue) and grows bed (brown). The grow bed is positioned so that it is higher than the fish tank so that gravity will allow the siphon to work correctly and return the water to the tank.
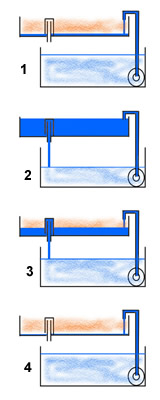
An aquarium pump runs continuously, pumping the water from the fish tank into the grow bed, as seen in drawing 1.
In drawing 2, we can see that the water level in the grow bed has risen until the auto-siphon is completely submerged. The siphon has filled to the point that water has traveled up the outer sleeve and is now returning to the fish tank via the pipe inside the chamber.
The water flows faster as the water level rises and expels the air in the auto-siphon, creating the required siphoning effect. The water flows freely back into the fish tank faster than the pump can pump the water into the grow bed.
In drawing 3, we can see the water level in the grow bed starting to drop as the siphon continues to flow despite the pump’s efforts to keep up.
Drawing 4 shows the grow bed empty. The siphoning effect has been broken as soon as air enters the auto-siphon, and water is no longer present to be drawn back into the tank. With no siphoning effect, the pump can now keep up again, and the cycle begins again.
Depending on the size of your pump, grow bed, and auto-siphon this process may take 10-20 minutes. The aquarium pump is usually run 24 hours a day, so the cycle of flooding and aeration is continuous and offers the optimum growing conditions for most plants.
Using a Traditional Flood and Drain System
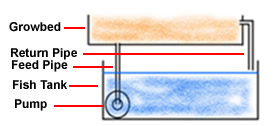
We call this a traditional flood and drain aquaponics system because this method has been used successfully in hydroponics for a very long time. As with an auto-siphon system, the grow bed (brown) is higher than the fish tank (blue) to allow the water to drain back into the fish tank. The aquarium pump does not operate full time but is controlled by a timer set to operate the pump for 15 minutes every hour.
As we can see in drawing 1, the cycle starts with the pump switched off. The grow bed is aerating as plant roots need oxygen too, and generally, the system will be in this state about 75 percent of the time.
Many aquaponics enthusiasts also like to program their timer so that the grow bed is not flooded at night. Flooding the grow bed at night is certainly not harmful; however, some gardeners believe that not flooding at night accommodates the plants’ nighttime needs more.
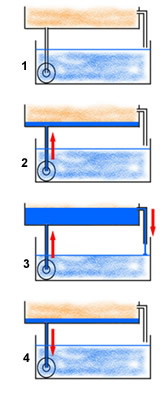
Drawing 2 shows the beginning of the flood cycle, the timer has switched the pump on, and water is now being pumped through the feed pipe and filling the grow bed.
Drawing 3 shows the grow bed filled with water from the fish tank. The pump is still running and forcing more water into the grow bed. The excess water is now returning to the fish tank via the return pipe. The water is forced through the gravel or medium in the grow bed and is filtered quickly before returning to the tank.
In drawing 4, we see the end of the flood cycle. The timer has switched the pump off, and the water is draining back through the feed line and pump back into the fish tank.
It is very important that a non-return valve is not placed on the feed line, or the water will be stuck in the grow bed, unable to return to the fish tank. Once the water has drained completely, the grow bed has returned to aerating as described for drawing one, and the cycle has commenced again.
So we can see that both methods of flood and drain accommodate your vegetables need to have a cycle of flooding and aeration to grow at their best.
Growth rates in a well-established and effectively run aquaponics system can be astounding at times but bear in mind when you start your system off. It will be perhaps a little slower until your fish are at a size to provide an adequate supply of poop and your grow bed has become established.
Getting Your New System Running
So let’s assume at this point you have assembled your DIY aquaponics system, or you have purchased one of the many excellent kits that are available these days, and it is installed and ready to use. Let’s have a look at the day-to-day running of your aquaponics setup starting from a brand new system.
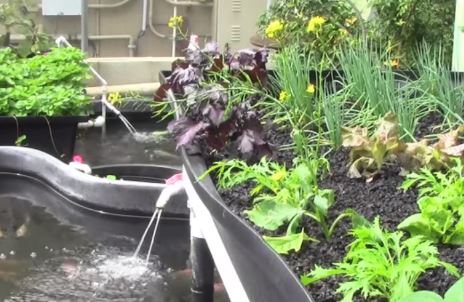
It will sound pronounced but let’s start by filling your fish tank up with water, and you grow bed with gravel. If the water you are using is chlorinated, you must remove the chlorine. If your water is chlorinated by chlorine gas, simply let it sit for two or three days, and the gas will dissipate.
If the chlorine is added as chloramine, you will have to use a water-aging solution, making sure it is suitable for fish for human consumption. There are water test kits available from aquaponics and aquarium suppliers that will allow you to confirm that chlorine is not present.
Turn your pump on and let your aquaponics system run for at least a few hours, making sure it works as it should and that there are no leaks. If it’s an auto-siphon system, it can be useful to measure the length of time it takes to flood and drain the system.
Once you are satisfied that the system is ready to go, it must be cycled to establish colonies of beneficial bacteria in the grow bed as described on the bacteria page of this site. To briefly summarize this, a source of ammonia is added to the tank, and the system is allowed to flood and drain as it would if it contained fish and plants.
This will allow a colony of bacteria to establish itself in the grow bed. As it takes about three weeks in favorable conditions for the tank to cycle and the bacteria to become established, it’s at this point that you could take a gamble and plant some seedlings in punnets to be later transplanted into the grow bed.
While the tank is being cycled, use an aquarium water test kit that allows you to measure ammonia, nitrites, and nitrate levels in the water.
Perform these tests every day and write down the results. Once you have found ammonia and nitrite levels of 5ppm or higher and that they have dropped down to zero, your tank has cycled. You should have measurable levels of nitrate if this is the case.
Place the unopened plastic bag into your fish tank and allow it to float there for a couple of hours. This will allow the water in the bag to slowly change the temperature to match the water in your fish tank and reduce the shock to the fish when they are released.
After this two-hour period, open the plastic bag and allow some of the water from your tank to mix with the water in the bag, and then allow a few minutes for the fish to grow accustomed to it. Release your fish into the tank gently and make sure there are none left in the bag before discarding it. Let them settle in a bit before feeding them.
When you first introduce your fish into the system, they are usually small and don’t create much fish poop. Some aquaponics enthusiasts prefer to wait a week or two for the fish to grow a little and bacteria to become more established before adding plants to the grow bed.
This is not a dangerous practice at all as long as you continue to closely monitor your ammonia, nitrite, and nitrate levels, which you should do at this critical time anyway.
These levels should be tested every day for at least six weeks after adding the fish and then tested weekly from there. If you are like me and your vegetables were seedlings when planted out, it makes little difference.
Running your Aquaponics System
The day-to-day operation of your aquaponics system is effortless and low maintenance. Generally speaking, I have to spend perhaps twenty minutes a day with my system at the very most.
Of course, nothing stops you from just standing there and enjoying the sight of your fish and watching your vegetables grow. Tending my system is, in fact, the most peaceful part of my day, and I enjoy it immensely.
You must maintain the water level in your fish tank at a reasonable level. For example, my system holds 500 liters filled to the brim, but I usually aim to keep the water level at around the 450-liter mark.
I top it up at the 400 liter level with five buckets of dechlorinated water. As aquaponics is a closed system, the only water losses you will experience will be caused by evaporation or the transpiration of your plants.
A lot of the fish poop will end up in your grow bed, but some will remain on the bottom of your fish tank and should be removed.
I siphon it using a length of ordinary garden hose, making a very effective underwater vacuum cleaner. Siphon the water and poop into a bucket so if you accidentally suck up a fish fingerling. You will be able to return it to the tank rather than letting it suffocate on the lawn.
How often you feed your fish is a personal choice to a degree governed by your lifestyle and available time. Of course, you should feed them at least once a day, but I prefer to feed them once in the morning and once at night, breaking that one larger meal into two smaller ones.
Remember that if you overfeed your fish, then uneaten food will contribute to poor water quality. It is a good idea to skip feeding them for a day now and then, particularly if you can see uneaten food in the tank.
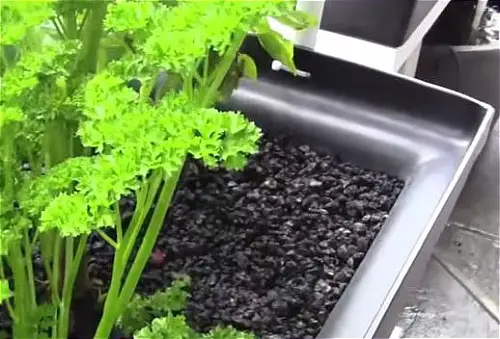
You are growing bed, particularly as the fish grow bigger and create more poop, should be well filled with plants. You can ignore recommended plant spacing to a degree as aquaponics ensures that the plant’s root system receives a steady supply of nutrients.
If you are propagating your own seedlings, make sure you have a constant supply to replace the harvest plants. For example, a bok choi matures in 8-10 weeks, and a bok choi seedling will be ready to transplant at 4-5 weeks.
So as you plant out, you grow bed with your current batch of bok choi seedlings. It is a good time to start some more to be ready to replace the current seedlings when they are harvested.
When you harvest your crops, do your utmost to return the gravel accumulated around the roots back into the grow bed and replenish it if necessary to keep the depth of the medium at the original height.
Continue to monitor the ammonia, nitrite, and nitrate levels in your fish tank weekly. If one of these levels is dangerously high, then drain on a third of the water from your tank, replace it with fresh unchlorinated water, and commence daily testing until the problem is resolved.
Observe the state of your plants as well and make sure they are green and healthy. For the first couple of months, as your system becomes established, they will not grow as vigorously as they would in a well-established grow bed.
If your fish are small, they may not poop enough to keep a full grow bed nourished, and you might consider only planting out half of the grow bed to start with.
Pest Control, Chemicals, and Your Fish
Most chemical pesticides will kill your fish! It is sad but true that when you take the step down the aquaponics path, there are several caveats, one of them being the effect of many pest control sprays and dust on your fish.
If you are currently a more traditional gardener, go down to the garden shed and look at your tomato dust, debris, and pyrethrum bottles. The chances are that the labels will contain many stern warnings about how deadly they are to fish. Using them is not an option.
I manage pest control in my open-air aquaponics system quite effectively without using chemical pesticides using three separate but combined approaches. Biological control by encouraging natural predators such as lady beetles, praying mantis, and spiders is an effective step.
Manual removal of pests is also effective. Pick the caterpillars, etc., off your plants and toss them into an ice cream container. When you have gotten all that you can find, empty these unwanted guests into your fish tank. Your fish will love them, and it will save you some feed too.
For horrible insect infestations, do all of the above and finish off with a garlic spray made by mincing garlic and soaking it in water. Strain the garlic off and apply the garlic spray to the plant leaves by a pressure sprayer. It really gets the bugs on the run. Repeat this regime for a few days, and you will soon notice a drop in pest populations.
My Aquaponics System
My first aquaponics system was a joy to construct and had pretty much worked exactly as it should. There were few trials along the way, and for the most part, I really only had to make one alteration to my original design.
It is a traditional flood and drains aquaponics system based on a 500-liter fish tank, and 250 liters grow bed. This system can comfortably hold 25 fish and grow them to over 1kg in size, suitable for the table. The components list is:

- 500-liter water tank with a removable lid
- 250-liter guppy tank for the grow bed
- 1000 liter per hour aquarium pump
- 13mm (1/2″) tub inlet with screen
- 100cm 13mm pipe for the inlet pipe
- 200cm 25mm (1″) PVC pipe for outlet pipe
- 3 X 25mm PVC 90-degree elbows
- 25mm PVC tube outlet
- 1500 liter per hour aquarium air pump
- 6 meters of air hose
- 1 air stone
- Timer for pump cycles
- Homemade welded steel grow bed stand
The 500-liter fish tank is actually a rainwater tank purchased from a large hardware store chain during a sale. The tank was marked down considerably in price and was such a bargain that I purchased two because I was keenly aware that I would not get another at that price.
One of its best features is the removable lid, allowing the fish to be out of direct sunlight and, more importantly, keeping our little coastal town’s pelican population from getting an easy meal.
Fully Utilized All That You Have
The grow bed is a guppy breeding tank that was unused for years in our garden shed after being purchased as a hydroponic nutrient tank. I also grow vegetables hydroponically, and at one point, this tank provided a central reservoir for a large top-feed hydroponic system.
It is filled with ordinary gravel purchased from a landscape supplier, but in the future, I suspect I’ll look at using hydro-clay for my media instead as it is lighter and has a larger particle size. This grow bed weighs over 1/4 ton when filled!
The stand that the grow bed sits on was constructed specifically for it as I had a spare length of steel cluttering up the backyard from another project. Your grow bed stand must be strong but not necessarily made out of steel, concrete blocks, or bricks, and railway sleepers, for example, will make a strong grow bed stand. Make sure your grow bed sits level.
Make Use of Return Pipe
The original return pipe for the grow bed was made from 19mm (3/4″) flexible tubing I have always used on my hydroponics systems. My aquaponics system has a larger pump with a higher flow rate, and the volume of water being returned is higher than any of my hydroponics systems.
This was not a problem until we suffered a heatwave, and the flexible pipe got soft, sucked itself closed, and caused the system to overflow. Fortunately, I was home at the time and noticed.
The flexible pipe was immediately replaced by a 25mm (1″) PVC pipe, resolving the problem. The inlet pipe is still 13mm flexible as the pump delivers the water under pressure, which cannot occur.
This aquaponics system was originally an experiment to see what aquaponics is all about. The system produces a steady supply of organic vegetables that taste just great, and the fish are progressing very well as of the time of writing. And we look forward to delicious natural fish soon as well.
We’re really hooked on aquaponics. Plans are already on the drawing board to reduce our hydroponic systems and replace them with aquaponics systems.
Read also:

I enjoy reading your posts on your website.
I would love to implement your aquaponic system at my residence. But, winter temperatures here in Maryland, United States get as low as 5° f.
Does it ever get below 32° f where your aquaponic system is located?
Here are some general advice on implementing an aquaponic system in a cold climate such as Maryland, where temperatures can drop below freezing.
Insulate your system: One of the most important things you can do to protect your aquaponic system from the cold is to insulate it well. Use materials like polystyrene or fiberglass to cover the walls of the tank and the pipes, and consider adding a cover to the top of the tank to prevent heat loss.
Use a heater: A heater can help to maintain a consistent temperature in your aquaponic system. You’ll need to choose a heater that is appropriate for the size of your system and can handle the coldest temperatures in your area.
Choose cold-tolerant fish: Some types of fish are better suited to cold temperatures than others. Trout, for example, can survive in water temperatures as low as 50°F, while tilapia are more sensitive to the cold. Do some research to determine which fish are best suited to the winter temperatures in your area.
Consider a greenhouse: If you have the space and resources, building a greenhouse can be a great way to protect your aquaponic system from the cold. A greenhouse can help trap heat and provide a stable environment for your plants and fish.